VNC (Virtual Network Computing) allows graphical programs to be run remotely with the ability to reconnect to that session should the network connection fail. The ECE Linux Lab systems have VNC software installed.
VNC sessions will not start if your account is over the disk quota.
The preferred way of connecting to a VNC connection is by tunneling it over SSH. However if you are having trouble with SSH tunneling, you may try accessing the VNC session directly following the instructions below. This will only work if you’re connected to Husky OnNet.
Either way, you will need SSH to make an initial connection to the Linux Lab computer.
I. Make Sure You Have the Software
The following software is required – it works on both Windows, macOS, and most varieties of Linux:
- A VNC client such as TightVNC, TigerVNC, or the Mac’s built-in Screen Sharing app.
- Husky OnNet. Unless you are physically in the ECE building and using a wired ethernet connection, you will not be able to connect remotely to VNC on our Linux machines without Husky OnNet.
- Terminal emulator – you will need a terminal to run SSH. The Mac has one built-in – it’s located at Applications -> Utilities -> Terminal. If you’re using Windows, Download PuTTY.
II. Connect to Husky OnNet
Launch the application and select “UW Campus Network Traffic Only”.
(If you happen to be on a wired connection in the ECE building, you can skip this step)
III. Start a VNC Session
In the examples below, linux-lab-069.ece.uw.edu is being used (and the example user’s NetID is nemo).
- Open your terminal program and connect to one of the Linux Lab systems using SSH. If you’re not sure of the name of the machine to which you’ve connected, use the hostname command:
[nemo@linux-lab-069 ~]$ hostname
linux-lab-069.ece.uw.edu
- Set a VNC password by running vncpasswd at the command prompt. Note that VNC passwords must be 8 characters or less – if you type a longer password, everything after character eight is ignored. (Technically you don’t need to set up a new VNC password if you’ve previously created one, but doing this each time ensures you remember what it is!)Note that while you’re typing your password on Linux, you will not see any feedback at all (no asterisks). Note: If the option to create a view-only password is offered, do not do so.
- You can start a VNC session by using the vncserver command as follows (note that you just type “vncserver” with no additional flags / arguments):
[nemo@linux-lab-069 ~]$ vncserver

New 'linux-lab-069.ece.uw.edu:2 (nemo)' desktop is linux-lab-069.ece.uw.edu:2

Starting applications specified in /homes/nemo/.vnc/xstartup
Log file is /homes/nemo/.vnc/linux-lab-069.ece.uw.edu:2.log
To verify whether a VNC session is already running, use the “-list” argument:
[nemo@linux-lab-069 ~]$ vncserver -list

TigerVNC server sessions:

X DISPLAY #	PROCESS ID
:2		11720
- Take note of the display number associated with the session. VNC ports start at 5900 – so when TigerVNC refers to “Display :2”, the port number VNC maps to that display is 5900 + 2 = 5902. If it tells you the display is “:3”, you’d need to use port 5903; and so on.
With your VNC session now running, you can now connect to that hostname and port number using VNC.
IV. Connect To your VNC Session
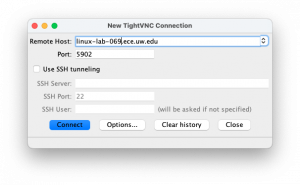
If you’re not tunneling your VNC session over SSH, you can use any VNC client you like. In the example below, we’re using the TightVNC Java Client.
- For “Remote Host”, use the name of the server you started the VNC server on (linux-lab-069.ece.uw.edu in this example)
- For “Port”, use the port number from steps 3 and 4 of the previous section (e.g. 5902 in this example)
(If you’re using Mac Screen Sharing or TigerVNC, you’ll notice there aren’t separate boxes for the host and port. In that case, you need to combine the hostname and port in this manner – linux-lab-069.ece.uw.edu:5902) - Once you’ve filled in all the fields, hit the “Connect” button
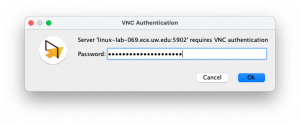
Next you will be asked for the VNC password you chose when you set up the VNC session.
There may be somewhat of a delay, but after all this you should soon see a new VNC window containing a Linux desktop session. If you see a blank window, be patient for a bit – but if it continues to be blank, end the current session and try starting over again using a different Linux Lab machine – the one you chose may already be bogged down with too many other users.
V. IMPORTANT: Close Your VNC Session When Finished!
From the command line on the remote machine, use the vncserver -list command to determine the display number of your VNC session. Then, run vncserver -kill to quit any sessions which need not remain open (note that you do not add 5900 in this case – use the exact display number reported).
[nemo@linux-lab-069 ~]$ vncserver -list

TigerVNC server sessions:

X DISPLAY #	PROCESS ID
:2		11720
[nemo@linux-lab-069 ~]$ vncserver -kill :2
Killing Xvnc process ID 11720
Appendix 1: If You Need to Reset Your VNC Session Password
Close any VNC sessions as in the previous section, then delete the vnc password file. This will wipe out any saved password for the VNC session:
[nemo@linux-lab-069 ~]$ cd
[nemo@linux-lab-069 ~]$ pwd
/homes/nemo
[nemo@linux-lab-069 ~]$ rm .vnc/passwd
And to be really sure nothing is running…
[nemo@linux-lab-069 ~]$ pkill -u $USER Xvnc
Then, return to the top of the page to start a new server.
Note: things will be more complicated if you have started VNC server sessions on multiple hosts. The easy way to avoid this problem is to not do that.